A little more than ten years ago my mother purchased a Volkswagen Bradley GT-I. Beautiful little kit car, I don't remember much about it from back then, but the important thing is, it quit. Mum and dad took it around to several mechanics and they all said it needed a rebuild. So bummed out at the cost of a rebuild my mother placed the car into storage. And there it sat for ten years. About a year and a half ago when I was entering eleventh grade, we decided I needed some hands-on experience in the world of mechanics, since this was my dream job. So armed with a pair of manuals, some hand tools, as well as some choice two by fours, I set to work. Unfortunately my brilliant self didn't document much of anything in this rebuild up until now, I have very little to show for this endeavor, aside from a really cool car that rumbles around under it's own power now.
This was supposed to be my senior year project, and here I am at the beginning of the year and my mechanic's elective is about done. Over the summer I've easily put about 150+ hours into this vehicle. Which, I know, isn't great for rebuilding a VW motor, but this is the first time I've ever done this. Now with what I know I'm confident I could do another complete tear-down and rebuild in a little less than a week.
Alright, enough rambling I suppose. I'll show you what I
did document.
Yeah, Imma fix this car! I'm an idiot with no clue what he's doing! (I really don't remember the context of my face in this photo.)
Anyway, enough silliness. This is before I'd touched anything on the car. That first crucial moment when the hood is opened. About at this moment I realized I didn't know much about cars. Oh, well best way to learn is to do it!
Got her opened up and check out the rust. Even on the pulleys! it's a good thing the block is aluminum, otherwise there might not have been much left.
I did some research and started on my merry way. First bit of business was to remove the engine cover. And then drain the oil. Now I'd done simple stuff before like oil changes, it's always a good idea to wear a thick leather glove, whether the oil is hot or not. Unless you like not being able to hold on to anything.
Now everything I read said that getting stuff back together was hard. So I labeled
everything. Which worked for the most part. Didn't have too much trouble piecing her back together later.
Again, I labeled it
all. And I mean it
all.
As a note, if a car sits for years on end, it tends to acquire...
tenants. They were easily evicted with a shop-vac.
Pulled the engine out. This actually took me a long time. I couldn't get the mounting bolts unstuck. It took me
two days before I figured out I was turning the bolts
backwards! Ahh, well. Live and learn, turned them the right way and pop! The engine came out. (Notice my fancy engine removal devices.)
Engine's out and I'm quite excited to finally have something to do again. I did throw a plastic bag over the transmission to keep the critters out.
The engine again. It's a '69 Beetle engine, 1500cc, with single port heads, and a PICT-3 carburetor.
Aaaand the covered transmission. The pipes are for the heat for the vehicle, currently disabled due to an exhaust leak. The old Volkswagen's had heater boxes around the exhaust pipes for... well, heat, they were notorious for rusting out and getting exhaust fumes into the cabin.
The brakes. Disk-brakes on all four sides. This Bradley has a '71 Beetle frame, the rear brakes where a challenge, as I though it had a '69 frame (Same as the engine.) until I looked up the frame's serial number. I had to do some work on the brakes later on.
Pile of parts as I pulled them off the engine block. It's amazing the way these engines are engineered. The fact it can keep itself cool with out some sort of liquid coolant still blows my mind.
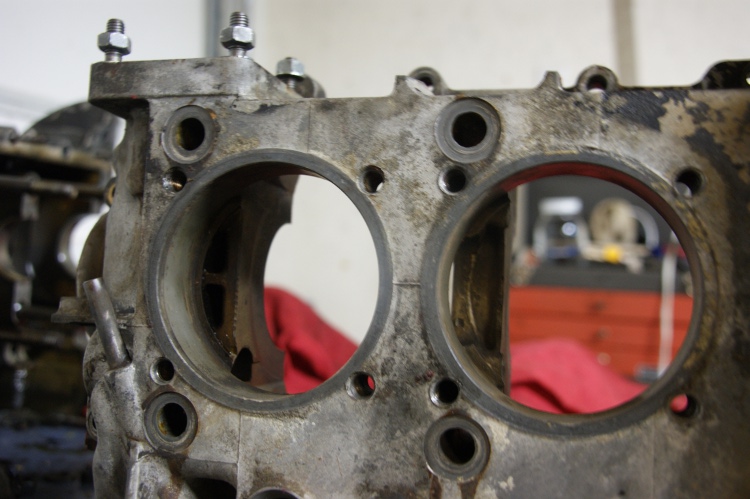
An example of before an after for the cylinders. They were kinda crusty and the rings needed to be replaced. These are the 32.95mm cylinders for the 1500cc engine, so the rings were a challenge to find. I actually ended up using 33mm rings, but it such a small difference I don't think the car cares overly much. I didn't want to put 35mm jugs on the car, too expensive.
Check this out! This engine is tiny once you pull everything off it! Still weighs a bunch though. I pulled several muscles goofing off with it.
Again, the engine. I got most of the black crud cleaned off later. And this ends the documentation of the tear-down. I didn't document the rebuild at all this summer. (I'm bad I know.) I replaced all the gaskets, got a new distributor (Important for later.), cleaned the carb, got a new ignition coil, and oil cooler.
Engine's back in here! No biggie, just took about an hour to get her lined up with the transmission since I only have a cheap jack and some two by fours. After that I shoved her in and found she didn't crank. This is where I added the ignition coil. Fired right up after that.
Pulled the wheels off now that the engine's back in. She needs some new rubber since the old tires were dry-rotted. While she was up in the air I serviced the brakes, new shoes and hardware all around. We're going to get some disk-brakes one day. I don't trust these rusty drums very much.
The lightwieght Fenton racing wheels waiting for some new rubber. No real trouble here, we think one of the rims was bent (it didn't hold air with the new tire on it) and took it back to the tire mounting place. They sealed up the holes in that one wheel for no charge and we brought it back home. If any of you live near Westminster, SC go give Black's tires some business, they're local, honest and friendly. Not to mention they got me a good deal on these tires.
Also checked all the lights while it was up in the air.
They all seem to work.
Got her to crank up and rolled her out of the garage for cleaning.
Look at her out in the sunshine for the first time in years! She looks so happy.
IT WORKS! (Mostly)
After all that we got her on the road for a test drive and I found I have the wrong type distributor. I need a vacuum advance distributor for the PICT-3 carburetor this motor is equipped with. Those are a little hard to find for a decent price but hopefully something'll turn up. Also there's a little roll pin on the throttle plate in the carburetor that's missing, easy fix I just gotta get to it.
That's about it for today. I'll get the carburetor fixed soon and hopefully we'll be able to find a vacuum advance distributor.
(The photography contained within this blog is a mixture of the photographic talents of my mother, Cherry at Studio Seventh Sanctuary, my little brother, and myself. All rights go to them/us)