Showing posts with label parts. Show all posts

Tuesday, January 1, 2013

The Bradley GT-I: Unexpected Problems

So, when I last left off with the Bradley, remember how I said I only needed to fix the carb and get a vacuum advance distributor? Well I fixed both of those and found my next problem. The aluminum/magnesium alloy that the crankcase is made out of is extremely soft, and because of this the cylinders were loosening themselves and leaking all my compression and gasoline all over the road. So I was pretty much back at square-one. Took the entire engine out... again. And this time I stripped it down to the crankshaft. (Which looks to be in fantastic condition by the way.) 

So how does one keep a soft case from letting go of the cylinders? (Techically it's letting go of the heads since the cylinders are more like the meat and cheese in this mechanical sandwich, but whatever.) Case-savers. These cool little steel inserts that you stick into the block so you have steel on steel contact for the threads instead of steel on aluminum/magnesium al-yeah whatever. That stuff. They're about $30 including shipping. So that on top of another gasket set, (Paper gaskets tend to tear with removal and installation whether they're new or not.) as well as a few nitty-gritty stuff will leave us short some cash. Nothing too bad, but blegh. I just can't wait to actually have everything fixed on this car. 

Anyway I'm sure you're all quite bored with the preamble; so onward to the photos! 

I bought a pair of broken 205T distributors and out of the three I had I was able to make one serviceable unit. I love that orange distributor cap.


I dunno what was going on here... Have a photo of the half disassembled engine.

This is what had broken on the carburetor. It's a little pin that limits the throttle-plates range of movement. They're known to just fall out. I had some brass wire laying around that fit, so I'm using that until it falls out, then I'll invest the whopping thirty cents for a steel one glued in place. In the meantime, this works.

The crankcase came apart with much work for me. (My back! My baaack!) But inside it looks pretty clean.

Closer view of the inside. Ever wonders what the inside of your air-cooled VW's crankcase looks like? Well now you know.

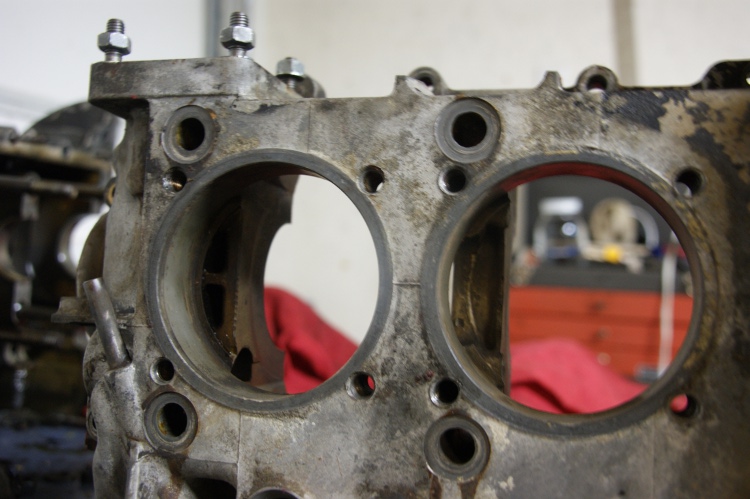
Aaand the outside. This thing needs some googly eyes at the moment.
Crankshaft. Work of beauty this is. Looks nearly new. Except for the oil finger prints.

Aand here's one of the two pile of parts for the engine. Everything is coated generously in motor oil (Except the aluminum.) to keep it from rusting in this humidity. But I still worry.


Anyway, yeah. There's the Bradley thus far. Next post I'll have the case-savers in and put the whole thing back together. I'll also paint the engine shroud sometime between then and now. Until next time. Peace out!

Thursday, October 18, 2012

Day 4: Retirement

Well, day four was exciting, sad and happy all in one. I got a buyer for some essential engine parts so I cranked the girl up and took her for one last ride to say goodbye for now. A good hour or so was spent zooming around on our local streets here taking some of my family members for one last ride in the old family car before I put her out of commission for an unknown amount of time. Now, there is something worth stating here. With the removal of the intake, (Excluding the MAF I had to temporarily put it back on to start the car.) exhaust and all that weight the MPV already acts like a sports sedan, and pulled 0-60 in a little under seven seconds with the overdrive on of course. It was a lot of fun to put the car through her paces one last time.
But then I had to move on and remove the distributor rendering the car undriveable for obvious reasons. Pretty straight forward and easy, but this marks a turning point, I'm actually doing this, I don't have the money yet, but hopefully something with come through and I can get started in earnest. Whether I sell enough parts to fund this or I get a part-time job I don't know but I certainly hope for either, but with the removal of a key part of the engine this signifies no going back to the old JEV6 now. The family car has been laid to rest and a workhorse for our family shall never be the same again...
Now the real adventure starts, turning a minivan/SUV crossover into a SCCA worthy race car.


Drove down the road to a gravel parking lot to get some final pictures of her before I retire the old JEV6.


The stickers shall be coming off when I repaint her.


Drove back home and popped the hood to get to work.
The distributor all hooked up like it's supposed to be.


After you pull the spark plug wires and remove the connectors from the distributor this is the only bolt holding it down. This is mostly a reference picture so we can get a good idea of where to set the distributor to get started with ignition timing. (Hopefully I won't be doing this again on this engine, but you never know.)


Removed. Noooo! There's a hole in my engine now! Plugged it with a red mechanics rag.


Also pulled the fan, fan shroud, and fan clutch off. Whee. Makes the engine compartment start to look really empty.


 Here's the fan clutch. This is not an original clutch, the original is in a box somewhere on one of my workbenches needing to be fixed.


Distributor after it was pulled off. Nothing special really, it's the original and it's in really good condition, my buyer is getting a steal of a price for it because I'm so desperate for the money. Anyway I'll get the gunk cleaned off of it and packed away in a box for shipping later.


And that's it for day four. Didn't do much aside from those joyrides. Heh, Imma miss being able to drive this girl up and down the driveway occasionally.

Day 3: Trimming the Fat


So, after a couple of weeks of tinkering with the Bradley and the other vehicles we have here on our land I finally got another day to make some real progress on the MPV. 
Mostly I've been working on pulling stuff out of the interior that either needs to come out to prepare for the swap or shall be replaced due to weight issues. I've also been doing a lot of research on the vehicle and what is and isn't compatible with it.
Anyway on day three I got the roof rack off, pulled a lot of the interior out and continued to dismantle a few bits of the engine to sell later. Also pulled the middle seats out to reduce weight, I'm looking into some lightweight racing seats for her later. Anyway, enough boring text right? On to the photos!

Removed the roof rack from the girl, I like the smooth lines it creates without the rack on. Plus, with something as blocky as this van I'll take all the aero I can get! Definitely going to sand down the holes and fill them since I have no use for a roof rack in the MPV's future.


The roofrack removed. I currently have a lizard residing in it.


Removed the rest of the plastic intake system, including the MAF and filter.


I also pulled the hood catch off for ease-of-access to the engine since I decided to put the hood back on. (My shop sprang a leak right on the engine bay. Unacceptable.)


Pulled the carpet and siding out of the back. Not hard to do, just a little tedious in my opinion. Also, you can note the rear heater unit here (White round plastic thing.) that'll come out as it weighs a good bit and I'm not going to need it as I don't use the heat, let alone the rear heater.


The other side with the tank for the rear-window cleaner.


I also took the side panels for the doors off, since I want to replace them as well as fix the door handles which are broken.


The rear door in it's un-assembled state. I'm thinking LED's to replace all the lighting in the vehicle. Those are lighter than the typical incandescent bulbs anyway right? I think so, but I need to research it later.


Anway, all in all I think I probably pulled about eighty pounds at least from the girl in siding and carpet.


The MPV has been sitting down in the shop for maybe a month now, and already it has collected it's own unique blend of... tenants. At least these guys are amusing and aren't poisonous.


I'm thinking... Well no I'm going to repaint the MPV sometime I'm not sure of the color yet, but there are a few very tiny rust spots that aggravate me right now, so I'm gonna do something to get right of them for now.


More rusties.


Now this is cool. I took the seats out because they weighed so much and I wanted to get to the fuel tank without dropping it. To begin with I couldn't figure out how you were supposed to get to the bolts for the seats. Hidden near invisibly are little seams in the carpet where you can lift little access flaps to get to them. Nifty!


The seats removed. It's quite spacious without them taking up all the room back there... Maybe I should install a hot-tub in the freed up space...


Anyway, mostly weight reductions performed today, and I can't wait to keep moving forward with this project.

Until next time,
Edward K. A.


Tuesday, September 11, 2012

Day 2: The Sound of Potential

Day two has come and gone. I didn't get much done today, put some trim back on the car after giving it a good scrub down. Pulled the exhaust out from under it and drove it around in it's un-muffled state for about ten minutes with an ear-to-ear grin on my face. Oh yeah, also threw some new fuses in and checked all the electronics, they all seem to work fine.
This JEV6 is a noisy booger! I mean, I thought the two massive mufflers were overkill, but now I know why they added them onto the van. It was so much fun to rumble around on our property with the floors shaking to the bass rumble of the engine, honestly though, a straight pipe system may be too loud for the finished product. I'd still like to be able to hear the radio while I'm drivin' around yah know?


The roof. It was sooooo dirty to begin with. Much cleaner now.


The hood where it now sits in my shop. I should have take a before and after photo of the underside. It was like black to begin with. Now the underside has the best paint on the car.

The second catalytic converter, and first muffler out from under the MPV. The first cat is still up in there just to keep the exhaust gases under the vehicle in case I have to move it around some.

Second muffler.


That's about it. I recorded a video showing just how loud this van is without a muffler. It doesn't do it justice, trust me, my ears hurt afterwards. Anyway, more to come soon!

Sunday, September 9, 2012

Day 1: Starting the Teardown

Alright, right off the bat Imma say this. I'm not labeling this as literal days, these are just the days I work on the vehicles. Also, if you see any parts coming off the car you want; please contact me, we can probably work something out.

Okay first day! Today I just did a bunch of simple stuff, pulled the hood and some trim off. Got most of the exhaust unbolted and dropped down. Pulled part of the intake off... and that's about it, gonna wait for some fuses before I do much of anything else so I can check to make sure she still runs. (I shorted the battery out a few days ago in a freak accident, blew the main fuses. Hopefully didn't damage the electronics though.)


With the hood and grill removed. Pulled the hood off for ease of access, same for the grill.


You can see the exhaust laying on the floor here, I had to cut the bolts holding with a Dremel tool because they were rusted solid. No damage to the exhaust system itself though. Getting it out from under the car should be fun without any form of lift. I'm really beginning to wish I had a lift and it's only the first day.


You can see where I pulled the intake scoop off the filter here.

Not terrible much done today, but hey! It's progress, you gotta start somewhere.